Have you ever published a post or made a CSS update and then gone to the homepage and it not be there? How about signed in and then gone to the homepage to find that you’re no longer signed in, but when you go to another post on the site you’re suddenly signed in again? Chances are good that the culprit is cache. In this article we’ll take a look at how to clear your WordPress cache.
Cache makes a website faster. In our world of fast-loading websites we all know the benefits of using cache to reduce server load for our scripts and images. Unfortunately this can sometimes cause issues such as not showing your latest updates. In order to see the updates you’ll need to clear the cache. Let’s look at the various types of cache and see a few examples of clearing each one.
What is Cache?
In the World Wide Web, cache is a location, or locations, where web pages or other elements are stored in memory so they can be retrieved quickly.
Here’s a simplified description in layman’s terms (in reality the web is more complicated than this, but the point’s the same).
Web servers and browsers use HTML instructions to build pages one at a time from components that are stored in different locations. Without cache these pages will have to be built every time the server is asked for the page. Cache stores that page in memory so it can be used over and over again.
For a WordPress website there are three types of cache:
- Browser – a place on your computer or device where your browser stores the information about a website that doesn’t change often. Rather than downloading the same information every time you visit the website, the browser pulls the information from its memory. The web page loads faster and the network uses less data.
- Cache Plugin – a plugin designed specifically to deliver premade web pages, speeding up the time it takes to recreate the page from HTML instructions.
- Server Cache – using their own cache plugins or scripts your host might store premade web pages in memory to deliver to your visitors, reducing the load on the server.
A problem can occur when one or more types of cache doesn’t recognize a website’s update or doesn’t consider it significant enough to clear its memory and reload the page. As you can see from this short list, cache for WordPress websites are stored in several places. You might or might not need to clear them all. We will start with the most common area to purge and move on to the least common.
Clearing Browser Cache
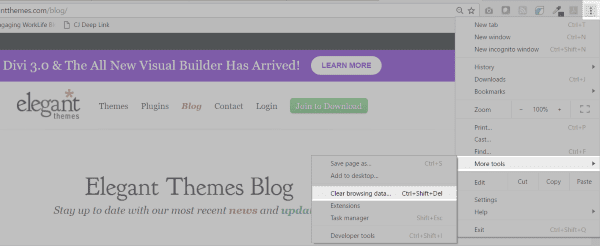
If only you are affected then you should clear your browsing data. Clearing the cache is different for each browser, but practically all of them have a cache clearing option in their options or settings. Here are the most popular and the steps it takes to clear their cache:
Chrome – Settings (three dots), More Tools, Clear Browsing Data
Firefox – Menu (hamburger), Options, Advanced, Network, Cached Web Content, Clear Now
Safari – Options, Reset Safari, Remove All Website Data
Edge – Options (three dots), Settings, Clear Browsing Data
If you only want to load a page without using cache then simply hit the F5 key. The page will reload without using the cached files. This doesn’t clear the browser cache.
Clearing Cache Plugin Data
If the problem persists on more than one browser or computer then you should clear your cache plugin’s data. Cache plugins provide cached data to browsers so the browsers won’t need to download files from the server every time. Even some security plugins that provide a firewall layer of protection will have cache.
If you’re website is hosted by a WordPress Managed hosting then they might not allow cache plugins to install. If this is the case then they are providing this caching either via their own plugins or on the server side and it can be cleared there. They may or may not have a method to manually clear the cache. If they do then you’ll find a cache clear or flush button within your dashboard or from the top menu.
Here’s a look at a few of the most popular caching and security plugins.
W3 Total Cache
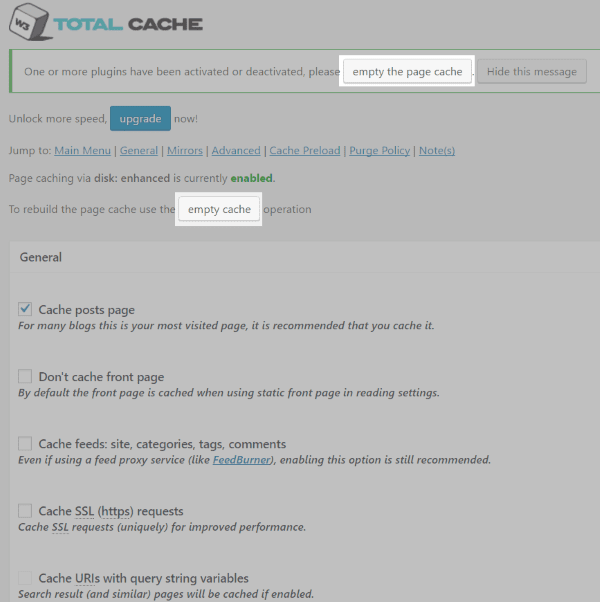
Many caching plugins include multiple cache options. For example, W3 Total Cache includes options for:
- Browser
- Page
- Object
- Fragment
Within each feature is a list of features to enable or customize.

You can clear the cache in just about any of the tabs or settings when you make changes. Click Save Settings and Purge Caches or click Empty Cache.
WP Super Cache
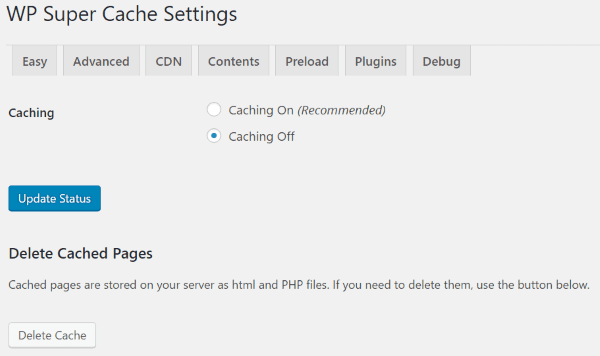
The WP Super Cache plugin has a feature to delete cache manually or automatically. The manual method is done by clicking a button on its main Settings screen (in the Easy tab) called Delete Cache.
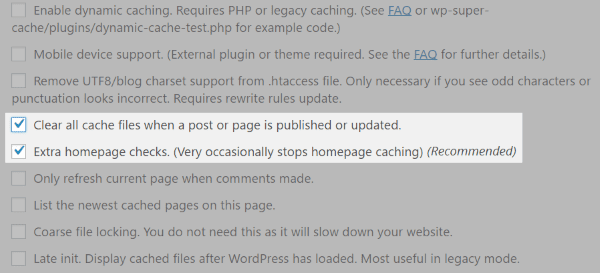
In the Advanced tab is another round of settings. The first one I’ve selected is labeled Clear all cache files when a post or page is published or updated. This setting is not enabled by default and it will get rid of the problem of needing to clear browser cache when you publish. The second is Extra homepage checks. This one is enabled by default. In the Advanced tab you can also set the cache timeout settings. This is a good option if your updates take too long to be recognized by the browser.
Sucuri
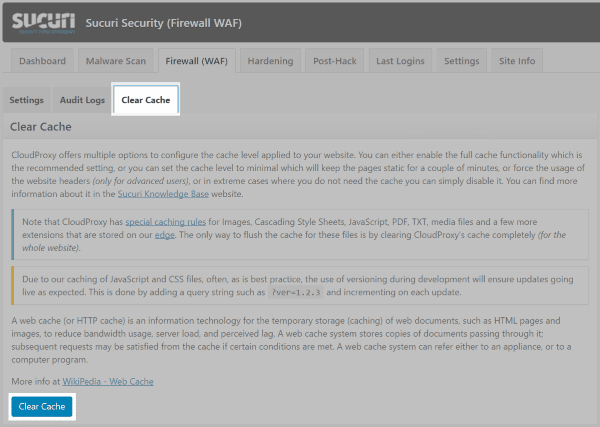
Sucuri uses cache for its firewall features. To clear this cache go to Sucuri Security in the dashboard, select Firewall (WAF), and go to the Clear Cache tab. At the bottom of the page click Clear Cache.
Clearing Server Cache
It is possible that your host is using cache plugins on the server even without telling you. This is especially true if you’re using managed hosting as many use server-side caching. Server-side caching includes:
- HTML – WordPress stores your website’s components in different locations. When a web browser asks for a page, the server builds that page based on the HTML code. HTML caching stores these pages so they can be reused rather than having to build the page from scratch every time.
- PHP – PHP pages have to be compiled in order to build the page. The pages are cached so the code doesn’t have to be compiled every time.
- MySQL – The database is queried for the same results every time someone visits your website. This caches the results until a new post is published or until there’s an update.
- Object – WordPress uses an object caching API to cache programmatic objects. This cache normally only lasts for one request. Caching the objects allows them to be reused.
Servers also run file swapping, virtual file systems, firewalls, sitemaps, etc. The control you have over server-side caching will depend on your host. You may be able to clear it in your host’s options settings. You can check for these settings within your cPanel or admin panel for the hosting plan. This is not done through WordPress.
If the setting isn’t provided they might clear it if you ask. They will ask that you perform all other cache options first. Some will provide an easy bypass solution for testing such as typing /?nocache=1 after your URL. Each host is different. I recommend reading their documentation.
Reverse Proxy

Many websites use a type of cache called reverse proxy. A reverse proxy is a server that retrieves resources on behalf of a client and then return them to the client as if they came from the proxy server, creating a shield for the framework.
If you’re using an HTTP reverse proxy such as Varnish then the cached version of your site will expire after a short time and your new content will display. You can adjust the time for the cache to expire in your provider’s settings. To purge the cache manually use a plugin such as Varnish HTTP Purge.
If you’re using a plugin such as Varnish Caching, you can adjust the settings of cache TTL (Time To Live) and purge the cash manually with the click of a button.
Content Delivery Network
If you’re using a CDN the process is basically the same with one caveat: it’s better not to purge the entire cache. The process itself will vary depending on your host. One popular CDN is CloudFlare, which we’ll use as our example although not all will be this simple.

To clear all cache, log in and go to Purge Cache. Select Purge Everything from the dropdown box. To purge an individual file, select Purge Individual Files from the dropdown box and tag the files you wish to purge.
CloudFlare recommends purging a single file rather than all files because the entire site will be slower until the cache is built up again. Purging a single file removes only that resource and the rest of your site’s performance doesn’t suffer.
Final Thoughts
Clearing your WordPress website’s cache is a common way to solve problems such as login issues, a web browser not responding or sluggish, and updates not displaying. Using the methods discussed here you can easily purge the cache from your browser, plugins, or server and get your website loading and working quickly.

